Sean Bagshaw Outdoor Exposure Photography

Images from the edge

See all image results...

Search Criteria
Exact matches only
Search in title
Search in content
Content Type
Select all
Search Posts
Search Prints & Stock Photos
Search Events
Search Pages
  • About
    • Sean’s Biography
    • A Look Through My Lens
    • Social Media
    • Alliances
    • Website Tour
    • Interviews And Podcasts
    • CV
  • Tutorials & TK Photoshop Plugins
  • Learn Nature Photography
  • Videos From My YouTube Channel
  • Signed Prints
    • Favorites Of 2023
    • OREGON
    • CANYONS AND RIVERS
    • CITYSCAPES
    • COASTAL
    • DESERTS AND PRAIRIES
    • FLOWERS AND PLANTS
    • FORESTS AND TREES
    • MOUNTAINS AND LAKES
    • NATIONAL PARKS
    • STREAMS AND WATERFALLS
  • PRINT OPTIONS
  • Stock Photography
    • OREGON
    • NORTH AMERICA
    • THE REST OF THE WORLD
    • AGRICULTURE AND VINEYARD
    • BUILT BY PEOPLE
    • NATURAL BEAUTY
    • OUTDOOR AND ADVENTURE
  • Books & Calendars
    • Calendars
    • Washington Evergreen
    • Oregon, My Oregon
    • Photographing Through The Seasons
  • Workshops
  • Events
  • Photography Blog
  • Sign Up For My Newsletter
  • Contact
  •  

Grants Pass Presentation: Photographing and Developing for High Dynamic Range

January 13, 2015 by Sean Bagshaw Leave a Comment

Grants Pass Presentation: Photographing and Developing for High Dynamic Range

Grants Pass Camera Club Third Wednesday Meeting

First Christian Church Fellowship Hall
305 SW H St Grants Pass, OR

Wednesday, January 21, 2015 7 – 9 pm

Presentation: Photographing and Developing For High Dynamic Range free and open to the public

Club website and contact
Bracketed-Series1

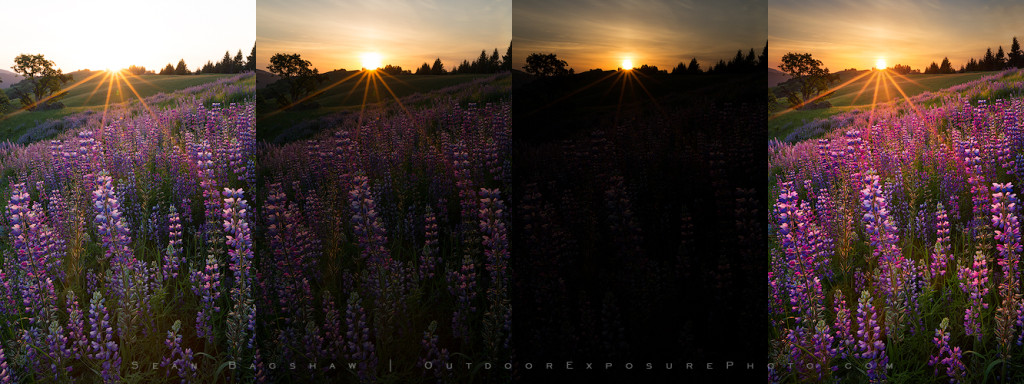
A common occurrence when photographing the landscape is that our images don’t match what we saw. The brighter areas in an image may be completely overexposed or shadow areas may appear totally black. This is because the dynamic range, or contrast, we encounter in nature is often at the edge of or beyond what our cameras can record in a single exposure. Fortunately, there are many ways to overcome challenges of high dynamic range light, both in the camera and in developing. Sean’s presentation will look at different types of natural light, how to evaluate the dynamic range in a scene and several techniques for controlling the dynamic range in your images.

Filed Under: Past Events Tagged With: digital workflow, Exposure Blending, landscape photography, Photography Presentation, Photoshop techniques

Image Developing Workshop Review

April 15, 2011 by Sean Bagshaw 2 Comments

Steve Cole, a photographer based in Washington, recently attended two of my digital image developing classes in Bend, Oregon. Steve is serious about photography and has spent a lot of time researching techniques and developing his skills. He drove to Bend from Seattle hoping that he could add some new techniques and skills to his repertoire.

Steve, it turns out, is also a very good writer. After the class he was motivated to pen a detailed review of the classes. His description of what goes on during the class and what content was covered is better than I could do myself. For a well written, unsolicited overview of what we were up to in Bend I encourage you to give Steve’s article a read.

Here is a short excerpt. “So were the two classes worth it? Without hesitation, I can say YES. From the minute you first meet him, Sean is friendly and engaging without any elitism or arrogance. He is just a guy who is passionate about nature and photography and who doesn’t love that? Before becoming a “pro” photographer 8 years ago, Sean was a middle school teacher and that really shows in his ability to teach and explain concepts.”

As Steve says in the article, I haven’t yet scheduled these classes again in the near future. If you have a venue and a group of 10 to 15 people who are interested give me a call.

Steve’s Blog: scolephoto.blogspot.com

Steve’s Website: www.scolephoto.com

Filed Under: Photography Journal Tagged With: digital photography, digital workflow, Exposure Blending, nature photography, photography workshop

Digital Image Processing Video Tutorials

March 2, 2011 by Sean Bagshaw 5 Comments

Digital Image Processing Video Tutorials

Digital cameras and image processing have revolutionized photography. There was a time when photographers had a holistic view of photography, mastering both the technical skills with a camera and the artistic skills in the darkroom to develop and process their images to perfection. Embracing the two sides of photography, capture and processing, allowed them to showcase their personal vision in their images. The advent of 35mm color slide film photography shifted the focus away from processing and placed greater emphasis on camera technique, with certain limitations. While camera technique is as important as it ever was, digital image processing has provided a path for photographers to get back in the “darkroom” and regain the creative control of developing and processing images.

In three separate video tutorial series I share knowledge, philosophy, guiding workflow and specific techniques that I use to process and develop my photographs.

Photoshop Basics For Nature Photographers Price: $39.99
Add to CartView Cart

New to Photoshop? Learn to apply Photoshop to your outdoor, landscape & nature photography including Bridge and Camera Raw, plus the basic layout, tools, palettes, adjustments and filters you need to know to get started processing your outdoor photographs using the power & precision of Photoshop CS.

This tutorial series is for Photoshop beginners or those who want to fill in gaps in their skills. Based in CS5, almost all of the content is also applicable to earlier versions of CS and Photoshop Elements.
Includes 23 video tutorials with over three and a half hours of content.

Digital Processing Workflow For Nature Photographers Pre: $44.99

Add to CartView Cart

This tutorial series helps you establish an organized, best practice, non-destructive workflow . The workflow progresses through image organization, raw processing, and non-destructive Photoshop techniques. Topics include image clean up, color and contrast, selections, adjustment layers, masks and soft proofing for print as well as creative processing techniques that I use.

These tutorials are based in Photoshop CS5 but most of the workflow is also applicable to earlier versions of CS and Photoshop Elements.

Includes 30 video tutorials with over four hours of content.

Processing For Extended DynamiRange Price: $44.99

Add to CartView Cart
These advanced tutorials provide instruction in powerful techniques that will help you overcome the limitations of cameras to properly record high dynamic range light. Techniques include raw processing, Photoshop adjustments, exposure blending and luminosity masking.
These tutorials do not teach how to use HDR software. The techniques are all based on Photoshop adjustments and layer masking techniques. Proficiency with Photoshop CS is essential. Not compatible with Photoshop Elements.
Includes 29 video tutorials with over four and a half hours of content.
Digital Workflow And Extending Dynamic Range Set Price $79.99 Add to CartView Cart
Get Digital Processing Workflow For Nature Photographers and Processing For Extended Dynamic Range together at a special price.

Tutorial Samples

Photoshop Basics

Processing Workflow

Extending Dynamic Range

Filed Under: Digital Image Editing Tips Tagged With: digital photography, Digital Photography Tips, Exposure Blending, fine art photography, intructional videos, photography technique

Exposure Blending Techniques In Landscape Photography

December 16, 2010 by Sean Bagshaw 7 Comments

Exposure Blending Techniques In Landscape Photography

I recently published an article on the Photo Cascadia blog discussing some of the basic exposure blending techniques I use. Exposure blending is the processing technique I get asked about more than any other, and this is the topic most requested in my digital image processing classes.

Greensprings Sunset

So, what is exposure blending? Simply put, it is a method of combining the best exposed portions of two or more exposures of a scene to maintain detail and balance in the brightest and darkest areas. Camera’s have serious limitations in their ability to “see” wide ranges of light. Scenes with a fairly narrow range of light can be captured in a single exposure. But in many dramatic natural light situations the range of light from the brightest areas, like a sunset sky, and the darkest areas, like a shadowed canyon in the foreground, are far outside the ability of film or digital sensor to record all at the same time. This is in contrast to our own eyesight which is able to see a very wide range of light.

For this reason, many of the dramatic light photos people try to take have sky that is completely overexposed or white and landscape that is completely underexposed or black. These images never live up to the way that the person taking the photo experienced the scene and often evoke the disclaimer, “it looked way better than this when I took it”. Since the invention of photography in the 19th century photographers have tried to compensate for this shortcoming. Traditional film photographers developed a long list of techniques, both in camera and through darkroom processing, to try to create images of high light range scenes that matched what they could see. Digital cameras and the ability to process images using computers have now given photographers the best options for dealing with this problem. It is possible to take multiple exposures of a scene in camera, exposing each image for a different part of the light range, and then combine the properly exposed portions of each into one final image. The product is a photograph that has light balance and shadow and highlight detail that more accurately expresses our vision. Photographs that would previously have been impossible are now possible, although not without some effort, skill and artistic vision.

Rowena Hills

There are automated software solutions, known as High Dynamic Range (HDR)software, that can blend multiple exposures automatically, making it possible for even the most amateur photographers to combine exposures and create high dynamic range images. The most current versions of Photoshop have HDR software built in. Other popular HDR software includes Photomatix, Nik HDR Efex Pro, and UnifiedColor HDR Expose. Currently, however, all the software solutions I have tried create quality issues for someone like myself whowants to create large fine art prints. They allow very minimal local control over the effects they create and often produce a very cartoonish or glowing look that may or may not be what is intended. Most problematic to me are the color shifts, low contrast and digital artifacts that can be introduced by HDR software. For these reasons almost all of my exposure blending is done using hand blending techniques with layer masks in Photoshop.

These techniques are an art form in their own right, taking years to master and greatly increasing the overall difficulty and level of skill required in the photographic process. The exciting part is that the creative control that darkroom masters such as Ansel Adams had, and that was largely lost in the era of color film, has now back in the hands of the photographer. Marc Adamus sums up the challenge and value of this approach eloquently on his website stating, “My process in the field today is more difficult, more complex and more creative than it ever was or could have been with film…to think about this all in the field and bring back the right exposures to fulfill my vision of the scene has taken considerably more practice than learning how to use a colored or graduated filter in the film days, and has also opened new creative avenues. Anyone who thinks of digital photography as a ‘crutch’ of sorts, simply does not understand these processes and the precision with which they must be executed in-camera as well as in processing.” Marc does such a good job communicating the ways that many contemporary photographers work that I would encourage you to read his entire artist statement if you have the time.

Deep Forest

If you are interested in learning more about the basic concepts and techniques behind exposure blending I would recommend reading my articles, Bracketing Exposures For Exposure Blending and The Basics Of Exposure Blending. I also offer classes on exposure blending as well as private instruction.

I’d love to hear your comments related to this topic. If you are an outdoor photographer, is this a technique that you use? What are your experiences with it? If you are not a photographer, what are your impressions such contemporary photography techniques? Please feel free to leave me a comment or share this article using the social media links below.

Filed Under: Photography Journal Tagged With: digital photography, Exposure Blending, photography technique

How Many Exposures To Bracket For Exposure Blending Or HDR?

September 8, 2010 by Sean Bagshaw Leave a Comment

As photographers we frequently struggle to overcome the limitations of our equipment in order to create the photographs we envision. One of the biggest limitations of traditional photography is the narrow dynamic range of light that can be contained in an image compared to what we see.

Techniques for blending exposures vary from simple to highly complex. They can be accomplished using skilled layer masking techniques in Photoshop. We also have the option to use one of a rapidly growing list of exposure blending programs commonly referred to as High Dynamic Range (HDR) software.

One of the most common questions I’m asked in classes and workshops on the topic of bracketing exposures for exposure blending and HDR imaging is, “how do you know how many exposures you need to bracket?”

The goal is to capture all the dynamic range tonal information in a scene in a series of exposures. The sequence of images below shows four exposures I took of a high dynamic range scene on the Columbia River. Having all the shadow and highlight information recorded in the various exposures allowed me to blend them using layer masks to create the final image. I could have also used one of many HDR applications to blend the exposure values.

To read the full article I wrote on the Photo Cascadia Blog go HERE.

In the first exposure I noticed that both the shadows and highlights extended beyond the ends of the histogram.
By underexposing a stop I was able to contain most of the highlights.
Underexposing two stops enabled me to retain detail in even the brightest highlights.
Finally I overexposed by two stops to get an exposure in which no shadow detail was clipped. I did take an exposure one stop over exposed but didn't end up using it in the final image.
After careful blending using layers masks I did some additional processing for color and contrast to arrive at the final image.

You can read the complete article on the PhotoCascadia.com blog.

Please leave a comment or question below.

Filed Under: Digital Image Editing Tips, Digital Photography Tips Tagged With: digital photography, Digital Photography Tips, digital workflow, Exposure Blending, HDR photography, photography technique

© 2026 · Sean Bagshaw Outdoor Exposure Photography