Sean Bagshaw Outdoor Exposure Photography

Images from the edge

See all image results...

Search Criteria
Exact matches only
Search in title
Search in content
Content Type
Select all
Search Posts
Search Prints & Stock Photos
Search Events
Search Pages
  • About
    • Sean’s Biography
    • A Look Through My Lens
    • Social Media
    • Alliances
    • Sign Up For My Newsletter
    • Website Tour
    • Interviews And Podcasts
    • CV
  • Tutorials & TK Photoshop Plugins
  • Learn Nature Photography
  • Videos From My YouTube Channel
  • Signed Prints
    • Favorites Of 2023
    • OREGON
    • CANYONS AND RIVERS
    • CITYSCAPES
    • COASTAL
    • DESERTS AND PRAIRIES
    • FLOWERS AND PLANTS
    • FORESTS AND TREES
    • MOUNTAINS AND LAKES
    • NATIONAL PARKS
    • STREAMS AND WATERFALLS
  • PRINT OPTIONS
  • Stock Photography
    • OREGON
    • NORTH AMERICA
    • THE REST OF THE WORLD
    • AGRICULTURE AND VINEYARD
    • BUILT BY PEOPLE
    • NATURAL BEAUTY
    • OUTDOOR AND ADVENTURE
  • Books & Calendars
    • Calendars
    • Washington Evergreen
    • Oregon, My Oregon
    • Photographing Through The Seasons
  • Workshops
  • Events
  • Photography Blog
  • Contact
  •  

Correct Wide-Angle Perspective Distortion Using Photoshop

June 18, 2020 by Sean Bagshaw Leave a Comment

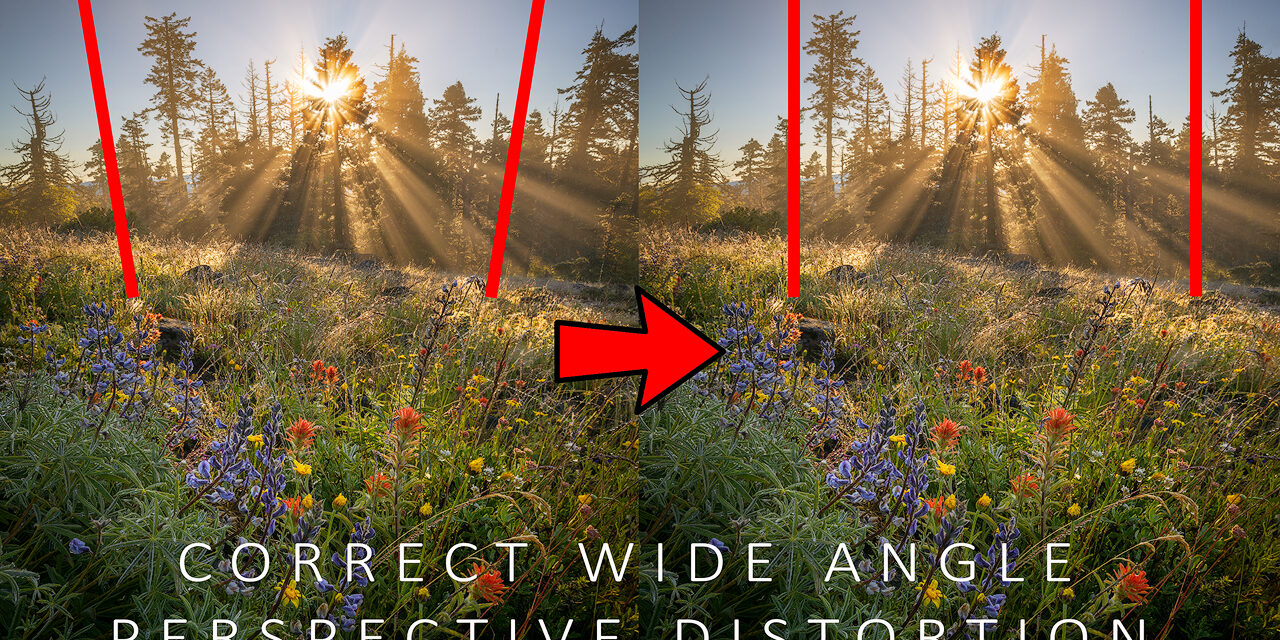
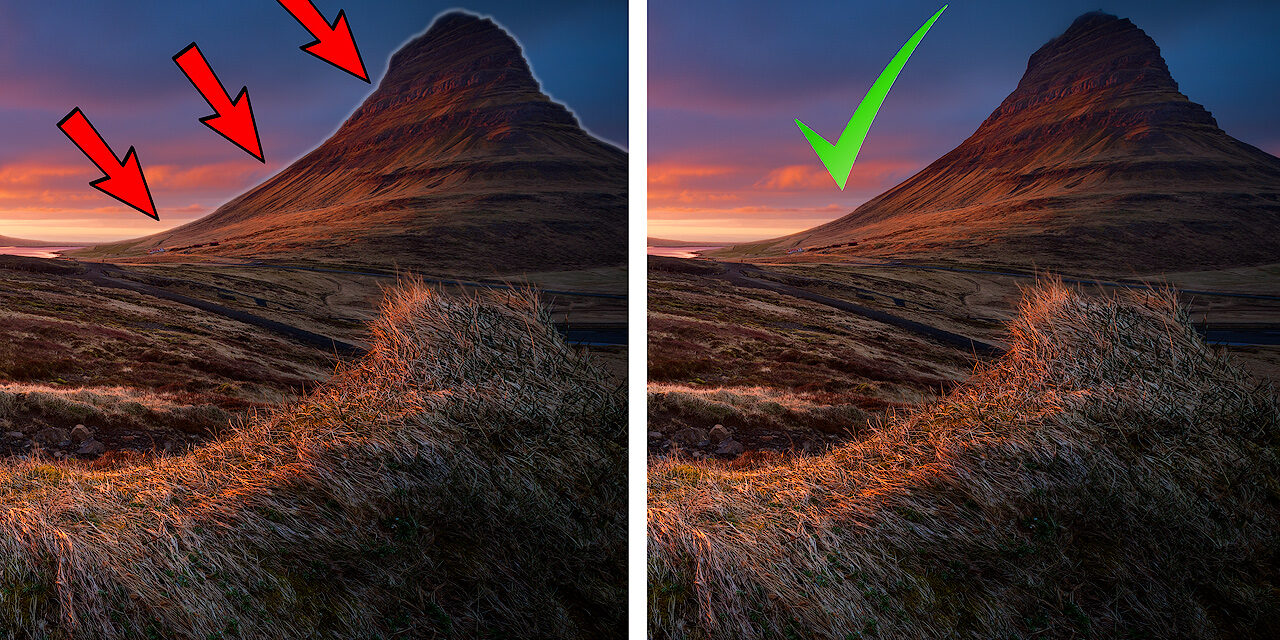
In this video tutorial on my YouTube channel, I show how to correct the wide-angle distortion that happens when we tilt the camera down to emphasize the foreground and move the horizon toward the top third of the frame. I also wrote an article on it on the Photo Cascadia blog that includes before/after image examples if you want to check that out.

I'll also mention that this technique is included in my latest Photoshop course which is called Photoshop Essentials For Outdoor Photographers. There is an introductory price on the course through June 2020 using the code PSessentials25.

Filed Under: Digital Image Editing Tips, Photography Tutorial, Video

Photoshop Layer Masks Explained!

April 29, 2020 by Sean Bagshaw Leave a Comment

This tutorial is for those just getting started with Photoshop. In it I explain what layer masks in photoshop are and how they work. When starting out in Photoshop, learning to use different kinds of layers and layer masks can be frustrating. The challenge of understanding how layer masks work can be the stumbling block that keeps many of us from learning or using Photoshop. If that sounds familiar then I hope this video helps.

Filed Under: Digital Image Editing Tips, Photography Tutorial

Live Luminosity Masks Tutorial – TK Panel Layer Mask Mode

March 19, 2020 by Sean Bagshaw Leave a Comment

Filed Under: Photography Tutorial, Digital Image Editing Tips, Video

Fix Edge Halos With Darker Color Cloning

March 11, 2020 by Sean Bagshaw Leave a Comment

Ever have a problem with light edge halos cropping up in your images as you develop them? You often don't see them in screen size images, but they can ruin a nice print. In my latest video tutorial I show an easy and fairly quick way to make them disappear called Darker Color Cloning. I use it all the time and I think many photographers will find it useful. Check it out and leave a comment if you have any questions.

Filed Under: Video, Digital Image Editing Tips, Photography Tutorial

TKActions V5 Quick Tips

June 6, 2017 by Sean Bagshaw Leave a Comment

Periodically I am posting short video quick tips for how to use the TKActions V5 Panel on my YouTube channel. You can view the first four quick tips here. Subscribe to my YouTube channel so you can get notified each time I add a new one.


Filed Under: Digital Image Editing Tips, Video Tagged With: digital workflow

Sizing Images Made Easy (Easier?) On The PhotoCascadia Blog

September 14, 2011 by Sean Bagshaw Leave a Comment

Sizing images for screen and print output may be one of the most confusing and misunderstood concepts in digital photography, which is deceiving because it appears pretty basic on the surface. Even after more than a decade of moderately hardcore Photoshop use I still find new ways to confound myself in this area. This topic is steeped in misunderstanding, urban legend, faulty logic and general confusion. Screen resolution vs. print resolution? What is the correct resolution for the web? To resample or not to resample? How much can I enlarge an image for printing? Why shouldn’t I upload a bunch of full resolution 21 megapixel images to Facebook or email them to grandma?

I have published an article on the Photo Cascadia Blog that I hope will help clear things up a bit and allow folks to get a firm grasp on exactly how best to size images for different purposes. However, if you are a recreational photographer who isn’t concerned with optimal image output, you should maintain your blissful state of mind and avoid reading this article at all cost.

If you are already involved in using Photoshop or other photo processing applications to size your images then it could be a worthwhile read. You might be interested to know that screen images don’t need to be 72 ppi (pixels per inch) and that, in fact, ppi resolution doesn’t have any affect on how images appear on the screen? And what about always printing at a certain resolution such as 300 or 360 ppi? The reality is that resolutions as low as 180 ppi can produce prints that look the just as good to the eye as higher resolutions and sometimes even better. Check out the article to learn more and find out my personal guidelines and workflow tips for sizing images.

Filed Under: Digital Image Editing Tips Tagged With: digital photography, Digital Photography Tips, digital workflow, Photoshop techniques

New Blog On PhotoCascadia – Dust Spot Removal

April 1, 2011 by Sean Bagshaw Leave a Comment

My most recent article is now up over on the PhotoCascadia blog. Dust spots are a constant thorn in the side of the digital slr photographer. It seems that no amount of cleaning and care in changing lenses ever fully keeps dust from sneaking back on to our sensors. I hate to think how many hours of my life have been spent cloning dust spots off of my images. Even worse than having to remove the spots is to find out that not all of the spots were visible in the unprocessed raw file, but after making contrast, luminosity and clarity adjustments they show up. Depending on the developing techniques used it can be anywhere from difficult to near impossible to get the spots out without artifacts at this late stage in the game. The worst is when they go unnoticed until the image has been enlarged and printed.

In my article I share a very simple technique that can be used to help reveal sneaky dust spots so they can be dealt with right at the beginning of the Photoshop workflow. You can read the article on the PhotoCascadia blog.

Filed Under: Digital Image Editing Tips Tagged With: Digital Photography Tips, dust spot removal

Digital Image Processing Video Tutorials

March 2, 2011 by Sean Bagshaw 5 Comments

Digital Image Processing Video Tutorials

Digital cameras and image processing have revolutionized photography. There was a time when photographers had a holistic view of photography, mastering both the technical skills with a camera and the artistic skills in the darkroom to develop and process their images to perfection. Embracing the two sides of photography, capture and processing, allowed them to showcase their personal vision in their images. The advent of 35mm color slide film photography shifted the focus away from processing and placed greater emphasis on camera technique, with certain limitations. While camera technique is as important as it ever was, digital image processing has provided a path for photographers to get back in the “darkroom” and regain the creative control of developing and processing images.

In three separate video tutorial series I share knowledge, philosophy, guiding workflow and specific techniques that I use to process and develop my photographs.

Photoshop Basics For Nature Photographers Price: $39.99
Add to CartView Cart

New to Photoshop? Learn to apply Photoshop to your outdoor, landscape & nature photography including Bridge and Camera Raw, plus the basic layout, tools, palettes, adjustments and filters you need to know to get started processing your outdoor photographs using the power & precision of Photoshop CS.

This tutorial series is for Photoshop beginners or those who want to fill in gaps in their skills. Based in CS5, almost all of the content is also applicable to earlier versions of CS and Photoshop Elements.
Includes 23 video tutorials with over three and a half hours of content.

Digital Processing Workflow For Nature Photographers Pre: $44.99

Add to CartView Cart

This tutorial series helps you establish an organized, best practice, non-destructive workflow . The workflow progresses through image organization, raw processing, and non-destructive Photoshop techniques. Topics include image clean up, color and contrast, selections, adjustment layers, masks and soft proofing for print as well as creative processing techniques that I use.

These tutorials are based in Photoshop CS5 but most of the workflow is also applicable to earlier versions of CS and Photoshop Elements.

Includes 30 video tutorials with over four hours of content.

Processing For Extended DynamiRange Price: $44.99

Add to CartView Cart
These advanced tutorials provide instruction in powerful techniques that will help you overcome the limitations of cameras to properly record high dynamic range light. Techniques include raw processing, Photoshop adjustments, exposure blending and luminosity masking.
These tutorials do not teach how to use HDR software. The techniques are all based on Photoshop adjustments and layer masking techniques. Proficiency with Photoshop CS is essential. Not compatible with Photoshop Elements.
Includes 29 video tutorials with over four and a half hours of content.
Digital Workflow And Extending Dynamic Range Set Price $79.99 Add to CartView Cart
Get Digital Processing Workflow For Nature Photographers and Processing For Extended Dynamic Range together at a special price.

Tutorial Samples

Photoshop Basics

Processing Workflow

Extending Dynamic Range

Filed Under: Digital Image Editing Tips Tagged With: digital photography, Digital Photography Tips, Exposure Blending, fine art photography, intructional videos, photography technique

How Many Exposures To Bracket For Exposure Blending Or HDR?

September 8, 2010 by Sean Bagshaw Leave a Comment

As photographers we frequently struggle to overcome the limitations of our equipment in order to create the photographs we envision. One of the biggest limitations of traditional photography is the narrow dynamic range of light that can be contained in an image compared to what we see.

Techniques for blending exposures vary from simple to highly complex. They can be accomplished using skilled layer masking techniques in Photoshop. We also have the option to use one of a rapidly growing list of exposure blending programs commonly referred to as High Dynamic Range (HDR) software.

One of the most common questions I’m asked in classes and workshops on the topic of bracketing exposures for exposure blending and HDR imaging is, “how do you know how many exposures you need to bracket?”

The goal is to capture all the dynamic range tonal information in a scene in a series of exposures. The sequence of images below shows four exposures I took of a high dynamic range scene on the Columbia River. Having all the shadow and highlight information recorded in the various exposures allowed me to blend them using layer masks to create the final image. I could have also used one of many HDR applications to blend the exposure values.

To read the full article I wrote on the Photo Cascadia Blog go HERE.

In the first exposure I noticed that both the shadows and highlights extended beyond the ends of the histogram.

By underexposing a stop I was able to contain most of the highlights.

Underexposing two stops enabled me to retain detail in even the brightest highlights.

Finally I overexposed by two stops to get an exposure in which no shadow detail was clipped. I did take an exposure one stop over exposed but didn't end up using it in the final image.

After careful blending using layers masks I did some additional processing for color and contrast to arrive at the final image.

You can read the complete article on the PhotoCascadia.com blog.

Please leave a comment or question below.

Filed Under: Digital Image Editing Tips, Digital Photography Tips Tagged With: digital photography, Digital Photography Tips, digital workflow, Exposure Blending, HDR photography, photography technique

Important RAW Adjustments For The Best Large Prints

April 30, 2010 by Sean Bagshaw Leave a Comment

Important RAW Adjustments For The Best Large Prints

As a fine art landscape and nature photographer, one of my goals is to create the very best quality master files of my images that will produce prints with great detail, sharpness and clarity even at very large sizes. While the topic of how to create the highest quality prints in a digital workflow is deep and complex, I am going to share three simple RAW adjustments that are often overlooked but can make a big difference in the final quality of large format printed images.

RAW sharpening, RAW noise reduction and removal of chromatic aberrations could determine the success of this image as a large gallery print.

My latest article on the Photo Cascadia blog covers three simple but often overlooked adjustments that can be made during the processing of RAW files that will add subtle but critical quality to images destined to be printed as large format fine art or gallery prints.

Before chromatic aberration removal

After chromatic aberration removal

Many photographers are educated on how to best prepare RAW files for white balance, contrast, clarity, and color but either don’t know or forget to also make adjustments for RAW sharpening, noise reduction and removal of chromatic aberrations. All three are quick and easy to deal with and can create serious problems in large fine art prints if they are not attended to.

My article goes through each adjustment, what it does and how to use it, along with before and after examples. If you are using expensive camera equipment, practicing careful camera techniques and spending quality time processing your images in the computer for best print output, then you should absolutely know how to use these three simple RAW adjustments. The full article can be viewed on the Photo Cascadia blog HERE.

Filed Under: Digital Image Editing Tips Tagged With: Digital Photography Tips, image processing, Photoshop techniques, RAW image processing

Never Hurts to Check

August 26, 2009 by Sean Bagshaw Leave a Comment

Never Hurts to Check

Bandon Beach, OregonIt never hurts to check back through old images. I apply a fairly rigorous editing process to my images. After a shoot I download the images and then begin the deleting. Using Adobe Lightroom I first find any images that are out of focus, poorly exposed, etc. and delete them. Next I go through and flag all the images that I think may have some promise. Looking at just the flagged images I now go through again and give each image a rank from one to three stars, with three stars being the top level images. Finally I give color codes to some of the stared images, red to indicate a prime select and yellow to indicate a basic stock image. Once this is done I am now able to quickly get back to the best images from a shoot as well as sort them by their potential future use.

However, I need to stay in the practice of going back and looking through the images that didn’t receive a star or a color label from time to time. Often I will find a great image that slipped through the cracks or that I had a bias against at the time, but looks more appealing once I have distanced my mind from it a bit. The photo above of one of the rock formations and beach near Bandon is one such photo. When I took the photo I was hoping for a brilliant sunrise, so when the dawn came with gray conditions I was disappointed, but still dutifully took a few images. My lack of enthusiasm for the day affected how I saw this image when I was first editing the group of images it was in and it didn’t make the cut. Nearly a year later I came across it while searching for different beach images. Now that I have had time to distance my mind from the fact that there wasn’t a colorful sunrise the image really stands out to me. Now I rather like the dramatic, dark and somewhat ominous feel and muted tones. I have also moved the image quite a bit higher in my ranking system.

Filed Under: Digital Image Editing Tips, Featured Photo Tagged With: editing photos, how to organize images, ranking and organizing photos, sean bagshaw, system for organizing photos, using lightroom to organize photos

High Dynamic Range Photography Techniques

February 5, 2009 by Sean Bagshaw 14 Comments

High Dynamic Range Photography Techniques
This article is adapted from a presentation I recently gave to the Southern Oregon Photographic Association.

High Dynamic Range (HDR) photography is a type of photography that has seen a rapid growth in popularity recently. There are Flickr groups dedicated to it and it comes up regularly in photography forums across the web. In its most recent incarnation HDR photography involves combining multiple exposures of a scene using HDR imaging software, the most popular of which is Photomatix by HDRsoft. Just do a Google search for HDR photography or Photomatix and you can see thousands of examples of Photomatix HDR images.  The image below is typical of a lot of HDR images you will see out there. Some are technically excellent, some are uniquely artistic, some are captivating and some are just plain bad.

The purpose of HDR photography is to create an image of a scene that has a greater range of light values than can be normally be captured by a single film or digital image. Depending on how it is used, HDR imaging software can allow the photographer to create an image that is closer to what the human eye perceives when looking at a high dynamic range scene. However, more and more it is being used to create surreal, whimsical or fantastical photo illustrations that don’t necessarily reflect the human experience but fall into a whole new genre of photographic art (check out the Flickr group).

I often use the basic concepts of HDR imaging in my work because I like to photograph in very extreme lighting situations that are awesome to experience in person, but impossible to capture with a simple click of the camera shutter. Sometimes I use HDR techniques to create images that are pure fantasy. Most often my goal is to attempt to recreate my personal experience in a way that is more accurate than my camera can record. Therefore, much of my HDR photography does not have the stereotypical cartoonish, haloed, surreal look that you will find in a lot of the current HDR images being made. I also do not normally use Photomatix or other HDR software to create my HDR photos. Rather, I employ a variety of other techniques first, depending on the situation, and turn to software as a final option.

Before I get further into this discussion of high dynamic range imaging allow me to back up a bit and put a little context on the term “dynamic range”. Most simply put, dynamic range, as it applies to photography, is the difference between the maximum (brightest) and minimum (darkest) measurable light intensities for a given scene, film, sensor, screen, etc. This range in photography is often referred to in terms of stops. A stop equals a doubling of the amount of light. A one stop increase in light results in double the light intensity and two stops results in four times the light and so on. The following dynamic range values are open to much debate among photographers and a lot of different values can be found depending on who you read or talk to.  So to avoid getting an argument started, let me point out that I’m using values I borrowed from other sources and only use them as simple reference points, not as the final word on what the exact values may or may not be.

The human eye is said to have a dynamic range of as much as 24 stops. This would indicate that from the darkest shadow detail the eye can see, to the brightest highlight, the light intensity can double 24 times. That’s a bit misleading however, because as we scan a scene our eyes adjust rapidly to darker and brighter areas and our brain quickly composites the various information into what seems like a single image. In reality, if a person is to look at one part of a scene without scanning (this is closer to how a camera does it and is called instantaneous dynamic range) , the dynamic range of the eye is something closer to 14 stops. However, we normally perceive a scene with the greater effective dynamic range because we naturally scan with our eyes.

By comparison, slide film has a dynamic range of around 5 stops, print film around 7 stops and the data contained within a quality digital RAW file closer to 10 stops. The average scene you might photograph has a dynamic range of about 10 stops but the kinds of extreme lighting scenes that I like to photograph are often in that 14 to 24 stop range of human vision, and sometimes even beyond.  So the problem is that much of what we photograph is within the range of what our eyes can see, but outside the ability of a camera (film or digital) to record all at once. The result is that we often take images that either have shadows that are totally black (underexposed), highlights that are totally white (overexposed) or a combination of both. This can be really frustrating when you remember seeing an amazing sunset over a luminescent ocean, but your photos show only dark, muddy waves and a featureless white sky. Enter the need for HDR photography.

HDR photography is basically any technique for creating an image that contains a higher dynamic range than can normally be captured in a single frame in a camera (either film or digital). There are actually many ways to extend the dynamic range of a photograph , but a great number of digital photographers are now going strait to the computer software solution. While there are some great advantages to the “Photomatix” approach, I’ll point out some reasons why it might be worth it to have some other tricks in the HDR tool box as well.

So, what are some of the different ways to create higher dynamic range images? The ones I’m most familiar with include:

  1. darkroom techniques (available to traditional film shooters with serious darkroom skills)
  2. graduated filters
  3. careful processing of a RAW image file
  4. double processing a single RAW image file and manually blending the two versions together using photo editing software
  5. manually blending multiple bracketed exposures taken in the camera
  6. using HDR imaging software to automatically blend a set of bracketed exposures.

As it turns out, HDR photography is almost as old as photography itself (there is some good historical information on Wikipedia). In the late 1800’s photographers developed darkroom techniques that enabled them to create single images from two or more separately exposed negatives. This allowed them to produce a positive print that maintained the right exposure in both a bright sky and a dark foreground. Later, Ansel Adams and friends developed the Zone System which was designed to identify the best exposure for any scene that would later allow for the greatest degree of tonal information to be recovered in print. While not truly HDR because he was still working within the limits of a single exposure, his techniques did greatly improve the ability to get a high level of dynamic range from the negative to the print.

Graduated filters are perhaps the least post production intensive way to create HDR images. A graduated filter is generally a piece of glass or plastic that has a gradient on it that fades from dark (usually neutral gray unless a color shift is desired) to clear. The dark half of the filter is usually placed over the brighter sky with the transition lining up with the horizon and the clear portion over the darker foreground. The darker portion of the filter “holds back” some of the light (usually 1, 2 or 3 stops worth) while the clear portion lets all the light through from the darker foreground. While this doesn’t actually extend the dynamic range of the film or digital sensor in the camera, it does help balance a high dynamic range scene so that all the tonal information can be captured within the range of the camera (see example below). The biggest advantage to using graduated filters is that everything happens in-camera so there is no additional post processing time required. All darkroom and computer based HDR techniques require anywhere from several minutes to many hours of additional time. On the down side, graduated filters have a straight transition line that is very difficult to fit on a scene that doesn’t have a straight horizon, often resulting in a dark “grad line” cutting across trees, mountains, buildings or any other dark objects that project above the horizon.

Shooting and processing RAW image files (most current digital SLRs have the ability to shoot RAW files as well as jpegs) isn’t technically an HDR technique because it only uses the light captured in a single exposure. However, there is so much data captured in the RAW format that during processing using a RAW converter (many exist but most cameras come with RAW software.   Programs like Adobe Lightroom or Adobe Photoshop also support RAW processing) it is possible to recover both shadow and highlight detail that appeared to be outside the dynamic range when the image was taken. The degree of latitude, often one or more stops in either direction, can be enough to create a final image that has a much greater dynamic range than what the camera appeared to capture (see example below / click to enlarge). The advantages to this are that it is fast, easy and all done with a single exposure. One downside is that even RAW files are limited to how much dynamic range they can contain, so it only works to a point. Another is that trying to recover too much detail from deep shadows in this way can result in a high degree of digital noise.

Sometimes, I find that a single RAW file contains all the tonal range that is needed for a properly exposed image, but I’m not able to get the entire image to look good with a single RAW conversion. In these cases I will do what is called double processing the RAW file to create two different exposures and then manually blend the exposures using various blending techniques in Photoshop. Exposure blending is a tricky art/skill in itself that takes a lot of practice to do well. Alone, it could be the focus of a multi-day workshop (I’ll have to work on offering one), so there isn’t time to go into depth here. I have a very basic post on the topic HERE. In the examples below, the first image was RAW processed to have the desired sky exposure. The second is from the same RAW image file, this time processed for the desired foreground exposure.  The third is the result of blending the two exposures in Photoshop. This technique works great as long as the entire dynamic range of the scene is contained within the RAW file. For that reason this technically isn’t a true HDR technique either, but the results can be a much greater dynamic range than could be achieved by single processing the RAW file and way beyond anything that could be done with a jpeg capture or film.

When the dynamic range of a scene is too great to be reigned in with graduated filters or to contain within a single RAW capture, I apply the manually blended multiple exposure technique. The blending techniques I use here are the same as the ones I use with the double processed RAW file technique, and again are a topic for a multi-day workshop. The advantage of this approach is that I can take as many exposures in the camera as I need to contain the complete dynamic range of a scene. Using this technique I can easily take a series of exposures that can contain the full dynamic range of just about any situation, including the full 24 stops of human perception and even beyond. The blending process for combining two or more different exposures is tedious and can take hours or even days, and if not done well the result is obvious and bad. So, I only use it on images that I think are going to be great. There are many advantages. Most important to me is that this technique produces the cleanest, sharpest, artifact free, data rich final images. Another advantage is that I have complete creative and local control over how I blend the exposures and what I want the final image to look like, allowing me to get as close as possible to what I envisioned when I took the photo. In the example below, the dynamic range between the sky and the foreground was way beyond the 10 stops I could contain in a single RAW file. I didn’t want to use graduated filters so I could avoid the additional flare they can cause when facing into bright light and because of the irregular shape of the lighthouse projecting above the horizon. I bracketed four different exposures, but was able to create my final image by blending together just the darkest and lightest of them. I think the final result is not only appealing and believable, but also very high quality and noise free which means it looks great as a large print as well as on the computer screen.

Finally we come to the technique that a vast majority of HDR jockeys are using these days, and that is to combine the tonal values of multiple exposures using HDR imaging software, most popularly Photomatix. The technique for capture is the same as the previous technique, namely shooting on a tripod to avoid camera movement and bracketing two or more exposures that can contain the entire dynamic range of a scene, often in one stop increments. Some HDR images contain as many as seven different exposures or more. Using Photomatix is much quicker than manually blending, usually taking about five minutes or so. The advantages are that when it works well, it can do an amazing job and can sometimes handle tricky areas that are particularly difficult to manually blend. It can be a huge time saver and, as noted earlier, can produce some amazing surreal effects and artistic styles that can’t be obtained any other way. However, I usually only go to Photomatix as a last resort because, like with anything, there are trade offs. The controls in Photomatix are fairly blunt, making it difficult to make fine adjustments. Also, I find that what I see in the tone mapping (also a topic for another time) preview window is not always what the image ends up looking like once it has been rendered in its final form. Often times the resulting HDR image has strange color shifts, increased shadow noise, cartoonish colors, halos, edge fringing and an overall loss of contrast. Also, anything that moves in the scene from one exposure to the next creates weird ghost images in the final photo. In addition, the adjustments in Photomatix are only global, so any local adjusting that I need to do has to be done back in Photoshop, not saving me much time in the end.

In the following example I first blended four exposures of an old house using Photomatix to create the resulting HDR image. The software did a pretty good job in some areas. The image certainly contains a wide dynamic range of tonal values, but I wasn’t happy with the color in some areas, the overall contrast or the way that the movement of the clouds between exposures created problems in the final image. In addition, some areas of the sky were still overexposed. I fully admit that my skills using Photomatix are somewhat lacking, but I often find that no matter what I do, some images just don’t succeed.

Photomatix HDR image

Not satisfied with the result, I decided to spend the time working on a manually blended HDR image. It took a lot of painstaking work, but I found that the resulting image was much cleaner, with better overall dynamic range, color, contrast and sky detail. The manually blended image also has close to zero digital noise, edge fringing or artifacting making it a much higher quality file for creating fine prints.

Manual blend
Manual blend

The next photo (Double Falls) is of another high dynamic range scene. With a bright sky and very dark canyon I knew it couldn’t be handled with a single exposure. I shot several exposures and then generated an HDR image using Photomatix. I felt that in this case the program did a pretty respectable job. However, I decided I would also try my hand at a manual blend so I could do a direct comparison. Even at web resolution, my hand processed HDR has greater tonal contrast and density than the Photomatix image. I was also able to make creative decisions about localized luminosity, color and contrast that I could not with Photomatix.

While it is possible to get away with some digital artifacts and pixel degradation in web sized images, my large fine art prints have to be as sharp, clean and noise free as possible. Upon closer inspection, I noticed that the Photomatix image had much more shadow noise than the hand processed image, as well as strange color shifts in the water and areas that were still blown out.

Click to enlarge

The Photomatix HDR image also experienced edge fringing and loss of sky detail where clouds had moved between exposures.

Click to enlarge

So, in conclusion, I find that having multiple techniques to capture and create images when confronted with high dynamic range situations allows me to better express my visual experience and artistic vision through my photographs. Often the use of graduated filters or shooting and carefully processing my images in the RAW format is all I need to properly render the dynamic range of a scene that is just a little greater than average. As the dynamic range of the scene increases I begin to employ more agressive HDR techniques, such as double processing and blending a single RAW file or bracketing multiple exposures in the camera and blending two or more of these by hand. Sometimes I even use combinations of these techniques. Does HDR imaging software have its place? Absolutely. I choose to use it when time is a factor, when the images will only be shown at lower web resolution so noise and fringing isn’t as important, when I want to create something that has that very stylized “HDR look” or when nothing else I have tried works. In addition, I’m sure that HDR imaging software will continue to improve and advance. In the not too distant future, I fully expect to see digital cameras that have HDR sensors which will be able to capture 15, 20, even 25 stops of light or more in a single frame, which will make much of this discussion obsolete.

I’d love to hear other tips, techniques, opinions and experiences regarding HDR imaging, so please feel free to leave a reply or share this post.

Filed Under: Digital Image Editing Tips, Digital Photography Tips Tagged With: creating high dynamic range photographs, digital photography techniques, esposure blending, graduated neutral density filters, HDR imaging, HDR photography, HDRI, high dynamic range imaging, high dynamic range photography, photomatix, Photoshop techniques, sean bagshaw

Photo Tip: Blurry Trees

November 20, 2008 by Sean Bagshaw 2 Comments

Photo Tip: Blurry Trees


Much of my photography is of the greater landscape and I’m often trying to present sweeping vistas with sharp detail. However, I also like to photograph more intimate scenes and abstracts. One of my favorite abstract techniques is motion blur. This can be achieved a few different ways and is a particularly good technique for emphasizing leading lines in a photo while smoothing out distracting elements. The final result can often look more like a painting than a photograph.

I really like to use motion blur with trees that have staight trunks. The technique is more an art than a science, so a lot of experimentation and throw away images are required to get something that I like. I start by setting a relatively slow shutter speed and making a vertical pan (movement) with my camera. I have found that shutter speeds between 1/4 of a second and 1/20 of a second work best. I move the camera up or down, in as straight a line as possible and depress the shutter release as the camera is moving. At slower shutter speeds I pan slower and at faster shutter speeds I pan faster. It is hard to know exactly what will be in the frame so I repeat the process over and over so that I will have many images to select from. Panning the camera while it is on a tripod can help keep the motion steady and smooth, but also limits flexibility.

Physically panning the camera is often all I need to do to achieve the abstract look I’m going for. Other times I selectively add more blur by using the Motion Blur filter in Photoshop (Filter>Blur>Motion Blur). To do this I’ll create a duplicate layer of the background image and blur the duplicate. Then I’ll add a layer mask to the blurred layer and paint with a black brush on the mask to bring through any detail from the original image that I want to keep. This digital blurring technique can also be applied to images that were taken in focus without panning the camera. Digital blurring often takes just as much trial and error as panning the camera.

Several of my favorite photographers have used these techniques to create some wonderful abstract images, including Jesse Spear, Eddie Soloway and William Niel.

Filed Under: Digital Image Editing Tips, Featured Photo, Featured Photographer, Featured Photos Tagged With: camera panning, Digital Image Editing Tips, digital photography, Digital Photography Tips, Eddie Soloway, fine art photography, Jesse Spear, motion blur, nature photography, photography of trees, photography tip, Photoshop motion blur, shutter speed, William Niel

Creating Mystery With Motion And Blending

April 29, 2008 by Sean Bagshaw Leave a Comment

Creating Mystery With Motion And Blending

Griffin's Dream 1

One of the goals of my photography is to create images that have a sense of mystery and the surreal. Photography is so often based in pure realism, but I find that I am attracted to images that give a glimpse into fantasy or imaginary worlds. Many of my friend DAVID WINSTON’S photos have such a quality and I have also mentioned MICHAEL KENNA more than once. Although their subject matter is very different from my own, I am inspired by the photography of NICK BRANDT and GREGORY COLBERT.

Dark Places

In my photography I am often trying to show familiar subjects and locations in a way that is familiar while at the same time mysterious and fantastical. Unique perspectives, purposeful composition, extreme weather, motion and magical lighting can often create something extraordinary in an ordinary setting, but such conditions are not always available. Recently I have been experimenting with some techniques, both in the camera and in the computer, that give me more options when trying to achieve something mysterious and stylized.

Lunar Eclipse

Three of the oak forest photos accompanying this article are from a series I call Griffin’s Dream. I used a slow shutter speed (about .4 seconds or more) and panned my camera vertically during the shot. This caused the trees and grass to blur into streaks of light and dark that look somewhat like brush strokes and help to remove fine details from the scene, leaving only the main elements of form and color.

Griffin's Dream 2

In the right kind of light, panning, zooming and other camera motion effects can create a great final image. However, for the Griffin’s Dream series the light was very flat giving the scene low contrast and washed out colors, so I employed a second technique to arrive at the final interpretations. In order to increase saturation, contrast and dynamic range in the initially lifeless images I used different combinations of blending modes in Photoshop. Darkroom technicians first developed the practice of stacking transparencies or negatives in various ways to produce different effects, and similar effects can be achieved with blending modes in Photoshop. To use blending modes you start by creating one or more layers that are exact copies of your original image (Layer>Duplicate Layer). Then in the Layers Pallet select each layer in turn and change the blending mode in the drop down menu at the top of the pallet. The blending mode defaults to “Normal”, which means that no blending between layers is taking place. For low contrast images I find that a combination of Multiply, Overlay and Soft Light blends work the best, but you have to experiment and see what works for each image. I also individually control the degree of each blend using the Opacity slider on each layer. I think the final result is painterly, surreal and fantastical, more like an impressionistic painting or a forest vision from a child’s dream.

Griffin's Dream 3

Filed Under: Digital Image Editing Tips, Featured Photos, Photography Journal

Photoshop Tip: Two Pass Sharpening Workflow

November 27, 2007 by Sean Bagshaw Leave a Comment

Photoshop Tip: Two Pass Sharpening Workflow
Nearly all digital images need sharpening to some degree, and I apply various techniques and amounts of sharpening throughout my workflow. The most important sharpening stage, so that the final image looks crisp and focused, is done as a final step to the image once it has been sized for its intended use. When images are downsized they lose sharpness, as detail along edges is lost in the reducing process. When images are enlarged, the lack of sharpness inherent in digital images is magnified. Using Photoshop’s digital sharpening filters makes it possible to increase contrast along fine edges to bring back lost image sharpness. There are many ways to do this, but I have recently developed a technique that I think does quite well. It is important to note that digital sharpening is not a substitute for lack of sharpness in the original image. Proper focus, shutter speed and technique is required at the point of capture to enable good digital sharpening.First, open an image in Photoshop. Then, flatten all layers (if any exist) and size the image for its intended use (print, email, screen saver, etc.). For help on how to size images you can refer to my articles on SIZING FOR PRINTING or SIZING FOR EMAIL. Once the image has been sized it is time to apply sharpening to make it look appropriately sharp. The technique I have developed makes two sharpening passes. The first pass uses the Unsharp Mask filter set to add a small degree of sharpening to larger edges and details to help with the overall crispness and “pop” in the image. The second pass uses the Smart Mask filter set to add a greater amount of contrast to the very finest edges and lines in the image for razor sharp fine detail. Versions of Photoshop prior to CS2 don’t include the Smart Sharpen filter, so the second pass can also be made with the Unsharp Mask filter with good results.

Make sure that you are viewing the image at 100%, or, if it is a larger sized print, 50%. To complete the first, large detail sharpening pass go to Filter>Sharpen>Unsharp Mask. Select a Threshold of 1, a radius of .7 to 1.0 for web images and 1.5 to 2.5 for prints, and an amount in the 50 to 75 % range. I find it helpful to check and uncheck the preview box to dial in the right amount of sharpening. Select OK when you are finished. Now to sharpen the fine edges and details, go to Filter>Sharpen>Smart Sharpen (or Unsharp Mask again if your version of PS is pre CS2). Set the Remove box to Lens Blur, the radius to 0.1 for screen and web size images or .2 to .4 for prints, depending on how large the print will be, and finally, adjust the amount to 100 to 140% or until the desired sharpness is achieved.

I find that this two-pass sharpening technique does a great job of targeting sharpening to both the larger and finer details separately, especially for images that will be displayed on a screen. As with any sharpening technique, knowing how far to go without going too far is the key and some experimentation is needed to determine the best combination of adjustments for each individual image. Below are samples of a screen sized image. The first is not sharpened, the second is sharpened appropriately using this technique and the final image is over sharpened in my opinion.

sharp sample

Filed Under: Digital Image Editing Tips, Digital Photography Tips

Photoshop Tips: Sizing Photos For Printing

November 20, 2007 by Sean Bagshaw 4 Comments

Sizing digital images for various uses may be one of the most puzzling problems that the average digital photographer runs across these days. Do your eyes glaze over when trying to understand terms like resolution, pixels and dpi? Have you ever sent an image of your dog in an email that is so large that it fills up the recipient’s email in-box? Have you ever had an image enlarged and printed only to find out that the file size was too small and the printed photo is so pixilated that it looks like a graphic from an old Atari video game? If you answered yes to any of these questions then read on. Hopefully I can shed a little light on the matter.

In a previous article I provided some pointers for sizing images for email and the web. You can check out those tips by clicking HERE

Sizing images for printing is very different than sizing images for a computer screen. A concept that is difficult to wrap the mind around is the fact that the size you see an image on your screen is not the size at which it will print, unless you print at screen resolution, which generally does not have enough detail for good quality prints. For example, if I size an image to 4″ by 6″ inches at 80 dpi (dots per inch) it measures 4″x6″ on my monitor (this will be different from monitor to monitor depending on what the resolution of the monitor is set at). Screen resolution is usually between 72 and 96 dpi. At 80 dpi the 4″x6″ image looks great on my screen. When I print it, the print does indeed measure 4″x6″, but with only 80 dpi it is very blocky and pixilated. In order to get a detailed 4″x6″ print I would need to set the dpi much higher. When viewed on my 19″ screen, a 4″x6″ image at 300 dpi is too large to fit, even though it still prints as a 4″x6″ print (with much greater detail than the 4×6 @ 80 dpi). So, as you can see, how big an image appears on your screen does not necessarily indicate how large a print it will make.

Most cameras come with software that provide some help with sizing. However, this software is often oversimplified, giving the user very little control over the size and resolution of the final print. I prefer to use Photoshop, or some other advanced image editing software to size my images so that I have the most control. However, more contol also means more complexity, not something everyone wants. However you size your images, the requirements for getting good results remain the same.

Different methods of printing require different amounts of resolution detail, or dots per inch. If you don’t care that your print has jagged edges and visible pixels, then go ahead and print at 72 dpi. Some tests indicate that 150 dpi to be the minimum for good print results, but there are many factors that come in to play. For chemical process printing (non ink jet printing) 200 dpi is generally plenty of resolution. Most publishers (magazines, newspapers, etc.) have their printing standardized to 300 dpi and want all submissions at this resolution. The current generation of high quality ink jet photo printers are able to resolve detail in the 300 to 360 dpi range, although tests have shown that 240 dpi is almost indistinguishable and that 200 dpi gives great results. Knowing how the image will be printed will help you determine what dpi resolution to select when sizing the image.

Another consideration in selecting the dpi resolution at which to print has to do with the distance the print will be viewed at. Small prints that will be viewed close up benefit from higher print resolutions (240-300 dpi), while large prints that will be viewed from a few feet away can make due with lower print resolutions (150-200 dpi). Billboards that are viewed from hundreds of feet away are printed at 72 dpi and lower.

Once you know what dpi resolution you will select, the next thing to do before sizing is determine the native size of the image; in other words, the size at which it came out of the camera. In Photoshop it is easy to determine this. Open an image and then go to Image>Image Size. A dialog box will open that indicates the pixel dimensions as well as the dimensions in inches and the dpi (dots per inch). Next to the pixel dimensions it also indicates the total pixel count in thousands (k). It takes one million pixels (1000 k) to equal one megapixel. If the number in the dpi box already matches your desired print resolution, simply look at the inch measurements and they will show the height and width that the image will print. If the dpi is not correct for your desired print method, make sure that the “Resample Image” box is un-checked and then change the dpi to what you want. Once the dpi matches your desired print resolution you can now look at the image dimensions in inches to determine how large it is. For example, if you set the dpi to 200 and the dimensions in inches are 10 inches by 15 inches, the file will make a 10″x15″ print without any changes to its size. If you want to make a print that is 10″x15″ or smaller, then you are in good shape. Downsizing an image doesn’t create any resolution problems. Let’s say you want to make an 8″x12″ print. Simply re-check the “Resample Image” box, leave the dpi at 200 and then type 12 into the box that currently indicates 15 inches. If the “Constrain Proportions” box is also checked (which it should be) then the box indicating 10 inches will automatically change to 8. Click “OK” and your image will automatically be sized to print at 8″x12″ at 200 dpi. Remember not to save the image now unless you do so with a different name. Otherwise you will have permanently saved the image at the smaller size.

Now, let’s suppose that you want to enlarge the image so it prints bigger than its native size of 10″x15″ at 200 dpi. When enlarging, or upsizing, images you need to be a little more careful than when downsizing. To downsize, the software can simply remove pixels to shrink the image, which will not degrade how the smaller image appears to your eye. In order to enlarge an image, the software must add pixels. The act of removing or adding pixels is called interpolation. When interpolating an enlargement, the program uses complex math to decide how best to add pixels to make the image bigger. The current generation of interpolation software contained in Photoshop or third party applications, such as Genuine Fractals, is amazingly good at doing this. Lots of pixels can be added to enlarge an image without a noticeable decline in image quality. However, the computer can not add detail that wasn’t recorded by the camera, so at some point an enlargement will begin to show digital artifacts left by the computer doing its best to add large numbers of new pixels.

To enlarge an image in Photoshop, follow the same steps as when downsizing. Open the image in Photoshop and go to Image>Image Size. Uncheck the “Resample Image” box and enter the desired dpi resolution. This will show you how big the image will print at that dpi without any change in size. Using our previous hypothetic example, the image will print at 10″x15″ at 200 dpi. If you wish to print the image at 16″x24″ at 200 dpi, you know you will need to use interpolation to enlarge the print. As before, simply recheck the “Resample Image” box and change 10 inches to 16 inches. With the proportions constrained, the 15 inch box will automatically change to 24 inches. Click OK and Photoshop will enlarge the image accordingly.

How much can you enlarge an image and still maintain fine image detail? The answer is largely dependant on your own personal taste, the material the image is being printed on and the distance at which the image will be viewed. I have enlarged some 8×12 inch @ 300dpi images to 20×30 inches @ 300dpi with very good results, especially when viewed at normal viewing distance. The master print lab that I use has a very handy chart that helps visualize just how much various sized image files can be enlarged with good results. The chart can be viewed by clicking HERE.

So far, all of the sizing examples I have given have assumed that the image is being enlarged or reduced while maintaining the same dimensional proportions of the original. For example, an 8″x12″ image will perfectly size to 4″x6″, 10″x15″ or 12″x18″ because the proportions have not changed. However, it will not cleanly size to 5″x7″, 8″x10″ or 11″x14″ because the proportions are different. In order to size an image for printing and also crop the image to new proportions at the same time, use the Crop tool. Open an image in Photoshop and then click the Crop tool on the tools palette (or press “c” on the keyboard). With the Crop tool selected some cropping control boxes will appear below the menu tabs at the top of the page. Here you can enter your desired print dimensions and dpi resolution. If you wish to print an image at 8″x10″ at 300 dpi, simply enter those figures in the appropriate boxes. Then, move the crop tool to one corner of the image and drag to select the area that will be cropped. Once you have created the cropping area, you can use your mouse to move it around and fine tune your selection. You will notice that because you are changing the proportions of the image, some of the image will be cropped out. Once you are happy with your cropping selection, double click inside the selection or press the Return key and the image will be cropped and sized to your specifications.

Filed Under: Digital Image Editing Tips, Digital Photography Tips

Photoshop Tips: Sizing Images For Email

November 19, 2007 by Sean Bagshaw Leave a Comment

One of the great advantages of digital photography is the ability to easily share your photos with others. In addition to making traditional style prints, digital images can be posted on websites, uploaded to digital personal organizers, displayed on cell phones and emailed. In my business I email photos on a regular basis. I email photo submissions to publishers, proofs to commercial clients and archived image samples to stock photo buyers. But it isn’t just professional photographers who email lots of images. I also email shots of my kids to the grandparents and photos I took out skiing to my friends. Emailing digital images is most likely the number one thing that people using digital cameras do with their photos and yet many people don’t have a clue how to optimize their photos for best email performance.

The most important consideration when emailing photos is image size, especially for those of us with dial-up Internet connections, but also for those with broadband. If you set your camera to take images at a size that’s right for email then they are too small to make good prints, but if you try to email full size images they take a long time to send and don’t even fit on the screen for viewing. The solution is resizing. Most cameras these days come with software that can easily help you resize your images for email. It is also easy to resize images in image editing software such as Adobe Photoshop. However you go about sizing your photos, here are a few tips that I follow to make sure that I’m not the guy emailing photos so large that they overfill inboxes, take several hours to download and can’t be viewed without scrolling around. These tips only apply to photos that are intended to be viewed on screen but not printed. Print size files need to be large to give good print quality.

First, I like to size my photos so they are about 500 pixels on the longest side and have a resolution of 72 DPI (dots per inch). This enables them to be viewed on smaller monitors and even within the email message window without opening them full screen. 72 DPI is important because that is about the maximum resolution that a monitor can show. Images for print often need 300 DPI or more, but this is a lot of extra information that doesn’t make the image look any better on the screen. A 300 DPI image that is 500 pixels on its longest side contains 16 times more data than the same size image at 72 DPI.

Second, I save the resized images to be emailed with a different name in a separate email folder. This way I don’t change the original image file and I can safely delete the resized images from the email folder when I don’t need them any more without accidentally losing the originals.

Third, I save the email images as JPEG (.jpg) files and set the quality to medium (about 5 on the Photoshop scale) to compress the files even more. These steps ensure that I am emailing the smallest files possible and that they send quickly, don’t fill up all the space in someone’s inbox and can easily be viewed on screen.

One more tip if you are using software like Photoshop is to apply unsharp mask (Filter>Sharpen>Unsharp Mask) to the final sized image before saving and sending it. When you downsize an image it loses some detail that can be brought back with a little sharpening. Good luck and happy emailing.

Filed Under: Digital Image Editing Tips, Digital Photography Tips

Luminosity Masking

November 10, 2007 by Sean Bagshaw Leave a Comment

Apparently luminosity is a term that is used incorrectly by Adobe Photoshop and photographers in general. I won’t go into the correct astronomy definition of the term. However, the inaccurate concept of luminosity as it pertains to photography is still particularly useful. In photography, luminosity is considered to be the measure of the density of luminous intensity coming from or through a surface. In other words it is an indicator of how bright a surface will appear. Because of the limited ability of film and digital sensors to capture as much tonal range of light as the human eye can, photographic images are often challenged by areas that appear to have too much luminosity (over exposure) and areas that have too little luminosity (under exposure). In a scene where the human eye can easily see color and detail on a sunlit mountainside and in the shadow of a tree at the same time, the detail and saturation in these areas of a photograph of the scene would be compromised. Luminosity masking is a masking technique in Photoshop that allows one to accurately select and adjust the luminosity of different tonal values within an image. There are many ways of working with luminosity in Photoshop, including blending different exposures of the same image, dodging and burning, screening and multiplying and using curves or levels adjustments. While all are useful in a variety of situations, they also have their limitations because of the difficulty of confining the adjustments to specific areas of an image and easily blending the adjusted area with unadjusted areas so it looks natural.

Luminosity masking makes it possible to adjust the luminosity of varying degrees of dark, light and mid tone areas in an image in a way that is gradual and completely blended. This is done by converting luminosity channels into highly detailed masks that can then be used for targeted curves adjustments. It sounds complicated, which it is to some degree. However, the power, subtlety and precision the technique provides makes learning it a worthwhile effort for the serious photographer.

The following are a links to two photographer sites that have well written tutorials on luminosity masking. Tony Kuyper’s tutorial at www.goodlight.us is particularly excellent and has an accompanying set of actions that can be downloaded. Bob Johnson’s site www.earthboundlight.com has a tutorial on luminosity masking that takes a slightly different approach towards the same goal.

Filed Under: Digital Image Editing Tips

Overcoming Public Perception In The Digital Photography Age

October 24, 2007 by Sean Bagshaw Leave a Comment

Overcoming Public Perception In The Digital Photography Age

In a recent discussion with a friend of mine who owns an art gallery, and is herself a photographer, she confided that she finds it much more difficult to sell photography to collectors than other types of art. I attribute this phenomenon, in part, to photography’s history as a documentary tool and, in part, to the public perception that it is a product of technology, not a skill of the body and mind. Now that cameras are ubiquitous, there may also be the impression that, while not everyone can paint or sculpt, anyone can take a photograph.
In the last decade digital technology has completely revolutionized photography, not only making it possible for more people to easily and economically shoot, print and electronically share images, but also for art photographers to access a whole range of creative tools that were previously expensive, required specialized equipment or were not even possible. And yet, the new creative possibilities seem to have only decreased photography’s artistic value in the eye of some of the public. In fact, digital photography may now fall into a new category in the public view that is separate from and, for some people, lesser than, traditional film photography.

Through my own experience and conversations with professional art photographers and gallery owners, I have noticed a perspective that troubles me. With increasing regularity, people confronted with a stunning photograph that they clearly find engaging and pleasing are compelled to ask if it is a digital image, and if so, what’s been done to it. The general perception that seems to be emerging is that film photographs are more valuable as art than digital photographs. Additionally, digital photographs that have been digitally processed in any way often are given the least artistic value despite the fact that nearly all digital images are processed to some extent either in the camera or later on. I attribute this attitude, once again, to the technology involved and the access the general public has to it. Film photography is now seen as something a bit more archaic and requiring a set of skills not readily available to just anyone, while digital photography can be done by anyone with a cell phone camera. In addition, some would think that since digital processing or enhancing an image requires even more technology, it therefore requires less skill. With the use of Photoshop, people perceive that anyone willing to spend the time on a computer can turn any digital snap shot into a work of art. I also sense that the viewing public is wary of digitally processed images because of the potential to add, remove, drastically alter or completely fabricate the content of an image. It is accepted that a painting is simply a portrayal of the artist’s vision and not necessarily reality. In many styles of abstract painting the artist is intentionally trying to get away from reality. However, people tend to want their photography to be “real”, although real is very hard to define in any visual medium.

Computer technology certainly has enhanced the ability to do all sorts of interesting things, combining components of various images, adding textures, modifying colors and even entirely and virtually generating an image. However, even though I greatly admire and appreciate this as a completely valid art form, I’m inclined to call this type of art photo illustration or digital illustration, not pure photography. The knowledge that such manipulations are possible may partly be to blame for the public’s paranoia that any visually captivating digital image must have been created in this way. However, I strongly believe that digital photography that doesn’t require these techniques is equal to traditional photography.
I would like to think that with some education, the art viewing public can learn to have a much greater appreciation for the techniques, skill, craft, creativity and mastery required to produce fine photography, whether it is film or digital. Like painters, true photography masters spend years developing their eye, style and technique and they both have the goal of creating an image that communicates an idea or emotion, defines an element of design or embodies the personal vision of a scene. Photographers, like painters, use a variety of tools and techniques to best achieve this goal. Some of these are done in the camera at the time the photo is taken, while others are performed later in the process, but all require a level of competence and ability not possessed by the unpracticed. Many photographers spend days, weeks or years waiting for the right combination of elements to come together in a photograph, and even the masters may only be able to create a few truly great photos in their career.

The public does appear to accept the darkroom processing of black and white film, even though the skill isn’t necessarily understood or properly appreciated. I have yet to hear someone ask, “how has this been altered”, or “is that what the scene really looked like” in regard to a black and white darkroom print, but these are the most common questions asked of digital photos. However, a great black and white photo wouldn’t be nearly as great without superb darkroom skills and creative techniques. Ansel Adams is an obvious and overused example, but many people don’t realize just how much time he spent working on each of his famous images in the darkroom to get them to convey his vision the way he intended. Earlier in his career he was often frustrated by the lack of skill and technology needed to create a print that matched his vision. Much later he went back and remastered many images using new techniques and improved skill. I attended a show of his work that exhibited some of his original prints side by side with the remastered ones. There was no doubt in my mind that the latter photos were better and I didn’t hear anyone complaining that the remastered images were products of technology, not a sign of his matured mastery.

digital before
digital after

I would like to see digital processing achieve the same level of acceptance and respect as darkroom processing and for fine digital photography to rise above its “anyone with a camera could do that” reputation. I spend a lot of time carefully composing what I hope are visually captivating images, searching out exquisite light and using my knowledge of the physics of photography to get as much quality and detail from my equipment as possible. However, similar to a great black and white film print, the job is not done when I press the button. A digital sensor does not see in the way a human does, with mental filters of emotion, perception, context and experience. A raw digital image can be very flat and lifeless. Not unlike the traditional photographer, nearly every image I take requires some degree of processing using software, such as Photoshop, in my computer or “digital darkroom”. My goal is to get each image to adequately express my personal vision. Four different photographers will create four different photographs from the same location and time. This is partly due to where they decide to point the camera, but it is also due to the fact that each one of them experiences the scene differently depending on mood, perception, personality and prior experience. The digital darkroom is one of the most important tools for bringing out this individual and personal vision.

Unless I’m intentionally trying to create a photo illustration or composite, I do not alter or significantly manipulate the content of a photo. I do, however, regularly use technique and craft to adjust the contrast, correct the color, enhance or tone down saturation and vary luminosity in my images. These are very painstaking steps in the processing of an image in an attempt to bring out what I saw, felt and experienced at the time I took it. Some images require only a few seconds of my time to bring them to this state, while others I work on and struggle with for hours or days. Some images never achieve what I had hoped. Like Ansel Adams, as I learn new techniques or get better at old ones, I often go back and rework images in the hopes of making them better. My purpose is rarely to deceive or mislead (unless it is inherent in the natural composition or light), but rather to create and enlighten. The processes that I use are not a short cut and they are not an example of technology doing the work. Like a painter, or a film photographer, I use tools, as well as long practiced skills and techniques to achieve my intended final piece. Photoshop is a critical and necessary tool.

It may just be a matter of time, but my hope is that one day digital photography will be respected for the skill ,craft and mastery required to do it well in the same way that fine art film photography and other forms of art are. I look forward to a time when a digitial photo is appreciated for its content and the skill involved in creating it instead of questioned suspiciously, as if the photographer had somehow faked his ability to create something pleasing, engaging, controverial or interesting to look at and enjoy.

Filed Under: Digital Image Editing Tips, Photography Business, Photography Journal

Photographing A Lunar Eclipse

September 5, 2007 by Sean Bagshaw 9 Comments

Photographing A Lunar Eclipse

Since the beginning of human existence night sky events have inspired in us wonder, awe, inquiry, fear and superstition. Solar and lunar eclipses are particularly inspiring because they affect the largest and most important objects in the sky, the Sun and Moon. Armed with some basic knowledge they also provide us with a real-time opportunity to observe and understand the motion, relationships and interactions among the Earth, Sun and Moon. Solar eclipses (the Earth passing through the Moon’s shadow) happen less frequently than lunar eclipses (the Moon passing through the Earth’s shadow) and, due to the harmful effects of staring at the sun, are also harder to observe directly. Lunar eclipses occur about twice a year and, other than happening in the dark, are easy and safe to view. As such, they provide an excellent photography opportunity, one that can yield great documentation of a cosmological event and, with a little creative vision, compelling artistic imagery.

On August 28, 2007 a total lunar eclipse was visible from the western portion of North America. With clear skies and summer temperatures in the forecast a photographer friend and I decided to take the opportunity to try our hand at photographing the event. Even though lunar eclipses are common on a cosmic scale, they are rare enough in the course of a photographer’s career that there might only be a few chances to be in the right place at the right time to photograph one. Neither my friend nor I had photographed one before, so a little research and education was in order. There are many good sources of information on lunar eclipses on the Web. The following two links were particularly helpful in preparing to capture the eclipse on camera.

NASA’s Eclipse Info Site

The eclipse photo site of the famed “Mr. Eclipse”

A lunar eclipse only occurs during a full moon because that is when the Moon is situated directly opposite the Sun with the Earth in the middle allowing the Earth to cast its shadow on the Moon. An eclipse doesn’t occur with every full moon because the Earth casts a shadow along a plane in line with the Sun, but the Moon’s orbit only crosses some portion of that plane two to four times per year. The rest of the time the full moon is either above or below the plane of the Earth’s shadow and no eclipse occurs. Additionally, a full moon can only be seen at night due to its location opposite the sun. This means that even if an eclipse happens, you must be on the night side of the Earth to observe it. The day side of the Earth faces the Sun and faces away from the full moon, so people on the day side of the Earth during an eclipse will not be able to see it. The NASA link above provides some excellent diagrams showing how this works.

Photographing a lunar eclipse presents some challenges, but due to the slow speed and predictable nature, it is possible to prepare before hand and do a lot of trial and error while photographing one. The first challenge is being in the right place at the right time. Some enthusiasts will travel to a place on the planet where it is known an eclipse will be visible. Others, like myself, wait until an eclipse will be visible where they live. Weather is another challenge. If the sky is cloud covered the eclipse will not be visible. Many eclipses occur late in the night and getting out of bed can be a particular challenge for some. Also, a total eclipse can last up to several hours from start to finish, so some commitment and patience is required to photograph the entire thing.

Photographically speaking there are several considerations to take into account when preparing to photograph a lunar eclipse. To see the surface of the moon with a great amount of detail, a large telephoto lens is necessary. Lenses in the range of 300mm to 500mm will enlarge the moon enough for sufficient detail, but even larger lenses or small telescopes fitted for photography are needed to get a full frame image of the moon. A wider angle lens can be used with a film camera to take multiple exposures of the moon on a single piece of film. If exposures are taken every ten minutes or so, the final image will show the actual arc of the moon in intervals throughout the period of the eclipse. Most digital cameras aren’t able to take multiple exposures in one image, so to get this affect, individual exposures of the moon must be taken and then placed together in an arc in a computer using image editing software like Photoshop. For my image of the full eclipse arc I took photographs about every 10 minutes during the five hour duration of the eclipse. Then I selected 20 photos that I felt made a good sequence. In Photoshop I cut the moon out of each imaged, sized them and placed them in an arc on a black background. Then I superimposed the moon arc onto a foreground image that I took from the same location on the same night. The final image does not show the actual path of the moon in the sky, but does give a pleasing and somewhat accurate representation of the event. I chose to include the pre-dawn colors on the horizon for artistic affect even though a full moon is actually located directly opposite the rising sun.

Regardless of whether you want to take close-ups or a wide angle, multiple exposure image, you will need to be prepared to adjust the length of exposure as the eclipse progresses. A fully lit full moon is very bright and has the same exposure requirements as sunlight on rock (since that’s what it is). But, as the shadow passes over the moon and the light shifts from direct light to indirect light, the exposure times will lengthen considerably. For the completely lit full moon my exposure times were 1/400 of a second at f/5.6 with an ISO setting of 100. As the Moon passed further into the Earth’s shadow the exposure times became longer. I bracketed my exposures on almost every image to make sure that I had at least one image in which the moon was properly exposed. Eventually I reached an exposure time of one second. From calculations made before the shoot (with help from THIS website), I knew that with a 400mm lens, any exposure time longer than one second would not be fast enough to stop the Moon’s motion in the sky, resulting in a blurry image. To maintain my one second maximum exposure time I began to adjust the ISO instead of my shutter speed to offset the drop in light. In digital cameras, ISO is the measure of how sensitive the sensor is to light. Higher settings are more sensitive so they would allow me to maintain my one second exposure time, even though the Moon kept getting darker. However, higher ISO settings also introduce noise into a digital image, so I wanted to keep the ISO as low as possible to minimize noise. When the Moon was completely within the Earth’s umbral shadow (totality) my exposure was 1 second @ f/5.6 with an ISO setting of 640. Then as the Moon passed back out of the shadow I reversed what I did during the first half of the eclipse.

Many people have asked me about the color of the Moon when it is in totality. This particular eclipse featured a beautiful brick orange/red color. The color is determined by the way light is refracted through particles and clouds in the Earth’s atmosphere as it curves around the surface of the Earth. Depending on cloud cover, pollution, fires and recent volcanic activity, the color of an eclipsed moon can vary from light orange to brick red to dark brown. The difference in brightness between the lit and shadowed portions of the Moon during partial eclipse is so great that a camera can not “see” both the dark and light side at the same time. However, the human eye can, so when we observe an eclipse we see the reddish shadow advancing across the bright face of the moon but we see detail in all areas. What a camera sees is either the red shadowed side with the light side completely white, or the light side with the shadowed side completely black. By blending two different exposures of the moon in Photoshop, I was able to create an image that shows detail in both the shadowed and lit portions of the Moon during partial eclipse, much closer to the way it would appear the human eye.

I hope you have enjoyed viewing my lunar eclipse photography and found the information on eclipses and how to photograph them helpful. My lunar eclipse photos are available as signed art prints as well as more affordable special editon poster prints. If you are interested in purchasing a signed art print or a special edition poster, please contact me HERE.

Filed Under: Digital Image Editing Tips, Digital Photography Tips, Photography Journal

Next Page »

© 2026 · Sean Bagshaw Outdoor Exposure Photography